Showing posts with label DIY. Show all posts

Wednesday, September 5, 2012

Montessori Math: Division board DIY

Last year I started the process of creating our own Montessori Math pieces.
My husband helped me create some peg board bead boards for Division work, we just hadn't used them yet. Until today.

We are using a blended / modified Montessori room and today for our Problem of the Day I decided this would be a great way to introduce the Division Board.
The Spiral Problem of the Day book is from a Math book set I picked up 2 years ago (I free cycled a school districts stash of "out of date" books for 3rd, 4th, and 5th grade, sharing most of them, recycling the worn out ones and saving a complete set including supporting materials for myself.)


Montessori Homeschool
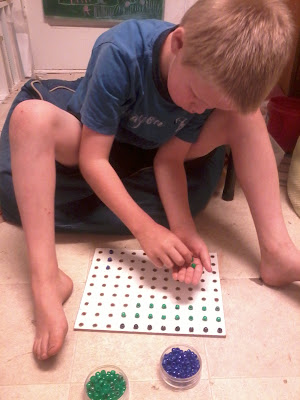
Using basic Pegboard, I enlarged the wholes so pony beads would fit but not fall through.
For our basic division I have a stack of 4 jars that screw together. Each jar has 100 green, blue, or red beads and 50 black beads.
The black beads act as the Divisor.  The green, blue, and red beads work together act as the Dividend.

homeschool
To make it easy to see the numbers I had Nathan build his 48 in the lower corner of the board. We had 8 black beads across the top and started to work out the problem exchanging tens for ones whenever we needed to.
homeschool
Working through the problem from his bean bag spot, my 7 year old is figuring out a story problem in parts.


Once we figured out how 48 muffins divided into the 8 "containers", we could count how many muffins were in just 3 of those containers.

We wrote in our Math journal to show how we worked through the problem, but that will be another day's post.


Thursday, July 19, 2012

Montessori Man brings color organization to our colored pencils

I've been thinking about  creating something to organize our colored pencils for a while now. I really like the Montessori colored cups but I know that the cups wouldn't make it back to the base so I decided to come up with something different.     I've been thinking about using a solid piece of wood for a while. Today I found a piece of 4x4 that at first glance was the perfectly length. Turns out, it was a perfect 24 inches long. 
I thought I could do it, but should have known better than to try.


Thankfully, unvlDad came to my rescue.
He put together the drill press and the vice to hold the wood in place and at the right height to drill 1 1/2 inch holes in 9 spots.


Here it is just waiting to be filled. The brightly colored pencil box it is setting on , was my pencil box in high school not to bad for 20 years old. Of course it just mostly sat on my desk when I doodled. My Mom found it full of Crayola Colored pencils and called me to tell me about her find. 

Filled with colors while still in the shop. I am so blessed to have such an amazing husband who is willing to rescue me and build such awesome things for our homeschool.


I love how the colors look all sorted. The whole thing sets up on a shelf until school time and then will set on the table between the boys so they can reach the colors they need.


Friday, February 10, 2012

DIY Montessori Math Tools

Homeschooling on a tight budget means you get creative. So when I decided to go with a Montessori style classroom for our upcoming school year I had to get creative. I knew I wanted a set of bead bars and bead chains as well as a Stamp Game, Checkerboard, etc...
I began with the bead bars. Nathan and I sat on the floor sorting pony beads into the colors we would need.
Red (1's), Green (2's), Pink (3's), Yellow (4's) Light Blue (5's), Purple (6's), White (7's), Brown (8's) , Blue (9's), Gold/Orange (10's).
 It was a tedious project but got them sorted and helped re-enforce the color scheme for him.
I finished the bead bars using pipe cleaners. I have a section that contains red, green, and blue heart shaped beads that will be using as skittles when we create our bead boards.  I still need to create the bead squares and cubes to go with the set, but for now this is what I have done. I do have a set of bead chains as well but haven't found a way to hang them yet, I have them in a recycled silver chest currently.

 Next I tackled the stamp game using card stock and clear packing tape. I arranged them into a small wooden drawer box. We have the mat to play the stamp game on. The mat has labels across the top for the columns (Units, Tens, Hundreds, Thousands), and 2 loose black ribbons for creating 2 numbers if we want. We have also used the bead bars instead of the tiles on the mat with success.
 Finally the Checkerboard I used felt and a recycled burlap coffee sack. 
We are using the number tiles from a SMATH game I picked up at Goodwill.


Friday, February 3, 2012

Teaching money with money

We are working on giving change in math and Cameron is having a lot of fun with it. I started out letting him use the change from a jar in the kitchen and Monopoly money since we no longer had any play money (the stuff that looks real.)

I decided to head to our local teacher supply store, Learning Palace to pick up a set of play money to make something for school. I was taken back by the cost of a box of play money, $24.95 for the smallest set they had. I know it is meant for a classroom, but still I was not going to pay that much.  On the drive home I started thinking about how much currency we would need to set up a little box of money. I figured it would be less than $25.00 to include enough to make basic change, so I decided to build one myself.

I have a small collection of old cigar boxes that I have been repurposing lately. This one seemed like a good fit for this project.


I started out with some 3 x 5 index cards and folded them to create the sections for the dollar bills. I had to trim them down slightly for them to fit inside the box.
The I cut out a section of an egg carton for the change, again I knew I would need that many coins (6 of each is more than enough)

I taped the bills section down as well as the coin holders down.

Finally I labeled the bill sections $10, $5, and $1

This little box is put away, but filled with just enough money that we can practice making change and counting it back to people. Using real money also means when both boys are done learning to count money and make change, I still have my $25.


Thursday, January 12, 2012

DIY magnetic poetry

I love re-purposing and creating learning activities. And I am now officially addicted to Pinterest.  I love being inspired and finding used for all the stuff I have managed to save for future uses.
I hosted a House party event last year and had a stack of magnet cards left over. I had seen a couple of blogs were they reused them and decided that would be a perfect idea.


Found an older package of Avery return Address labels in the homeschool closet and decided this would be the perfect size. I think the packaging has changed at least twice since I bought this package of return address labels, and I'm not sure but I think I have found more uses then just address labels for these little guys.
Since the Laser printer's cartridge is almost empty (less that 15% remaining) I decided I would hand write all the words. I think each sheets has 80 labels, I used 4 sheets of labels and most of the labels have 2 words. I used a combination of the Dolch word list (complete) and the a sheet of words I found on about.com. I wrote the words in fine point sharpie marker in a variety of colors


Here is one of the magnets ready to cut up.


I want to seal them before I cut them since the labels were older and might not stay on the slick surface of the magnet as well as I would like. I am going to use a mix of Elmer's White school glue and water to seal them.

On a side note this week while we were cleaning up the boys' bedroom I found the set of magnetic poetry that I had been looking for in a corner of their room... Oh well, I guess we will have the ultimate collection of magnetic poetry words.